DIY birdhouse: diagrams and step-by-step photo instructions. Stage #1 – preparation of wooden elements
A love for birds or a simple desire to get rid of pests on their property makes many summer residents think about making a birdhouse. Not everyone knows that not only starlings, but also many other birds can live in a birdhouse. For example, small owls can live in a birdhouse and will hunt for small rodents, and if you manage to place singing birds in your dacha, then you will be able to enjoy their beautiful trills throughout the warm season. In addition to practical and aesthetic benefits, making a birdhouse together with your children will help develop their love of nature and work.
How to make a birdhouse with your own hands, and what types of birdhouses there are, you can find out by reading our article.
Materials and tools for manufacturing
Professional ornithologists advise using hardwood boards to build a birdhouse:
- Alders.
- Aspens.
- Birches.
Softwood boards are not recommended because they release resin that can harm birds. There is also no need to make a birdhouse from plywood, because it has poor thermal insulation properties and the birds will be cold in such a house. In addition, plywood does not transmit sounds well, and this negatively affects the reaction of birds when predators appear. You should absolutely not build a birdhouse from chipboard or fiberboard; first of all, such a birdhouse will fall apart after the first heavy rain, and secondly, particle boards are made using toxic substances that can harm the health of birds.
 Larch boards
 In addition to hardwood boards, you will also need:
- Hand saw or electric jigsaw.
- Hammer.
- Drill.
- Chisel.
- Measuring tape and ruler.
- Pencil.
- Nails.
- Wood glue.
- Water-based paint (if you want to paint the birdhouse).
Take into account one more important point: no matter how much you want to build the most beautiful birdhouse, do not under any circumstances treat the surface of the boards with a plane! The boards should not be planed; this is necessary for the chicks to be able to climb up the walls of the birdhouse.
Making a birdhouse
Referring to the drawing below, perform the following procedure:


- Make markings by transferring the dimensions of the parts from the drawing to the boards.
- Using a jigsaw or hacksaw, cut out the parts according to the markings.
- Using a drill or chisel, make a hole with a diameter of 40 millimeters in the front wall of the birdhouse.
- Place the side walls in a vertical position and glue the front wall with the manufactured tap hole to them. It is very important to avoid gaps when gluing.
- After the glue has dried, strengthen the connections of the side and front walls with nails.
- Coat the lower ends of the connected walls with glue and glue the bottom of the birdhouse to them. After the glue has dried, also nail the bottom to the walls.
- Attach the back wall in the same way.
- Make the roof of the birdhouse by connecting the holding spike and the lid.
- Place the roof on the birdhouse. There is no need to nail or glue the roof, since it must be removable so that the birdhouse can be cleaned.
- Additionally, for the convenience of the birds, you can install a bar or pole in front of the hole.
A simple birdhouse made of boards is ready! All that remains is to hang it correctly on a tree or pole.
 Simple birdhouse
 How to make a simple birdhouse, see also in the video:
Birdhouse placement
In order not to harm the trees, you should not nail the birdhouse to a trunk or branch. Many people hang birdhouses on metal wire, but this method also harms the trees, because over time the wire damages the bark and the wood begins to rot. It is best to hang the birdhouse from a thick rope made of organic material or from a wooden crossbar sandwiched between branches.
 Methods for installing a birdhouse
 When placing a birdhouse, take into account the height; if you hang it very low (less than two meters), then wild and domestic predators can easily reach the clutch or chicks.
When hanging a house for birds, take care of their comfort, give the birdhouse a slightly tilted forward position, this will allow the birds to easily move from the bottom to the entrance.
When choosing a place for a birdhouse, do not place it near thick branches, which in windy weather can damage the structure of the house.
 Install a birdhouse with a partner
 Since the work of attaching the birdhouse takes place at a fairly high altitude, be sure to work with a partner who will insure and help you on the ground. It is also advisable that you have a mounting belt tied to the tree.
Birdhouses made from scrap materials
You can make an original birdhouse not only from wood. There are many objects from which wild human imagination can create a house for birds, let's look at some of them:
Birdhouse made from a plastic bottle
You can make both a large and a small birdhouse from a plastic bottle, everything depends on the volume. A plastic birdhouse is not suitable as a permanent home for birds, but as a winter feeder it is quite suitable. 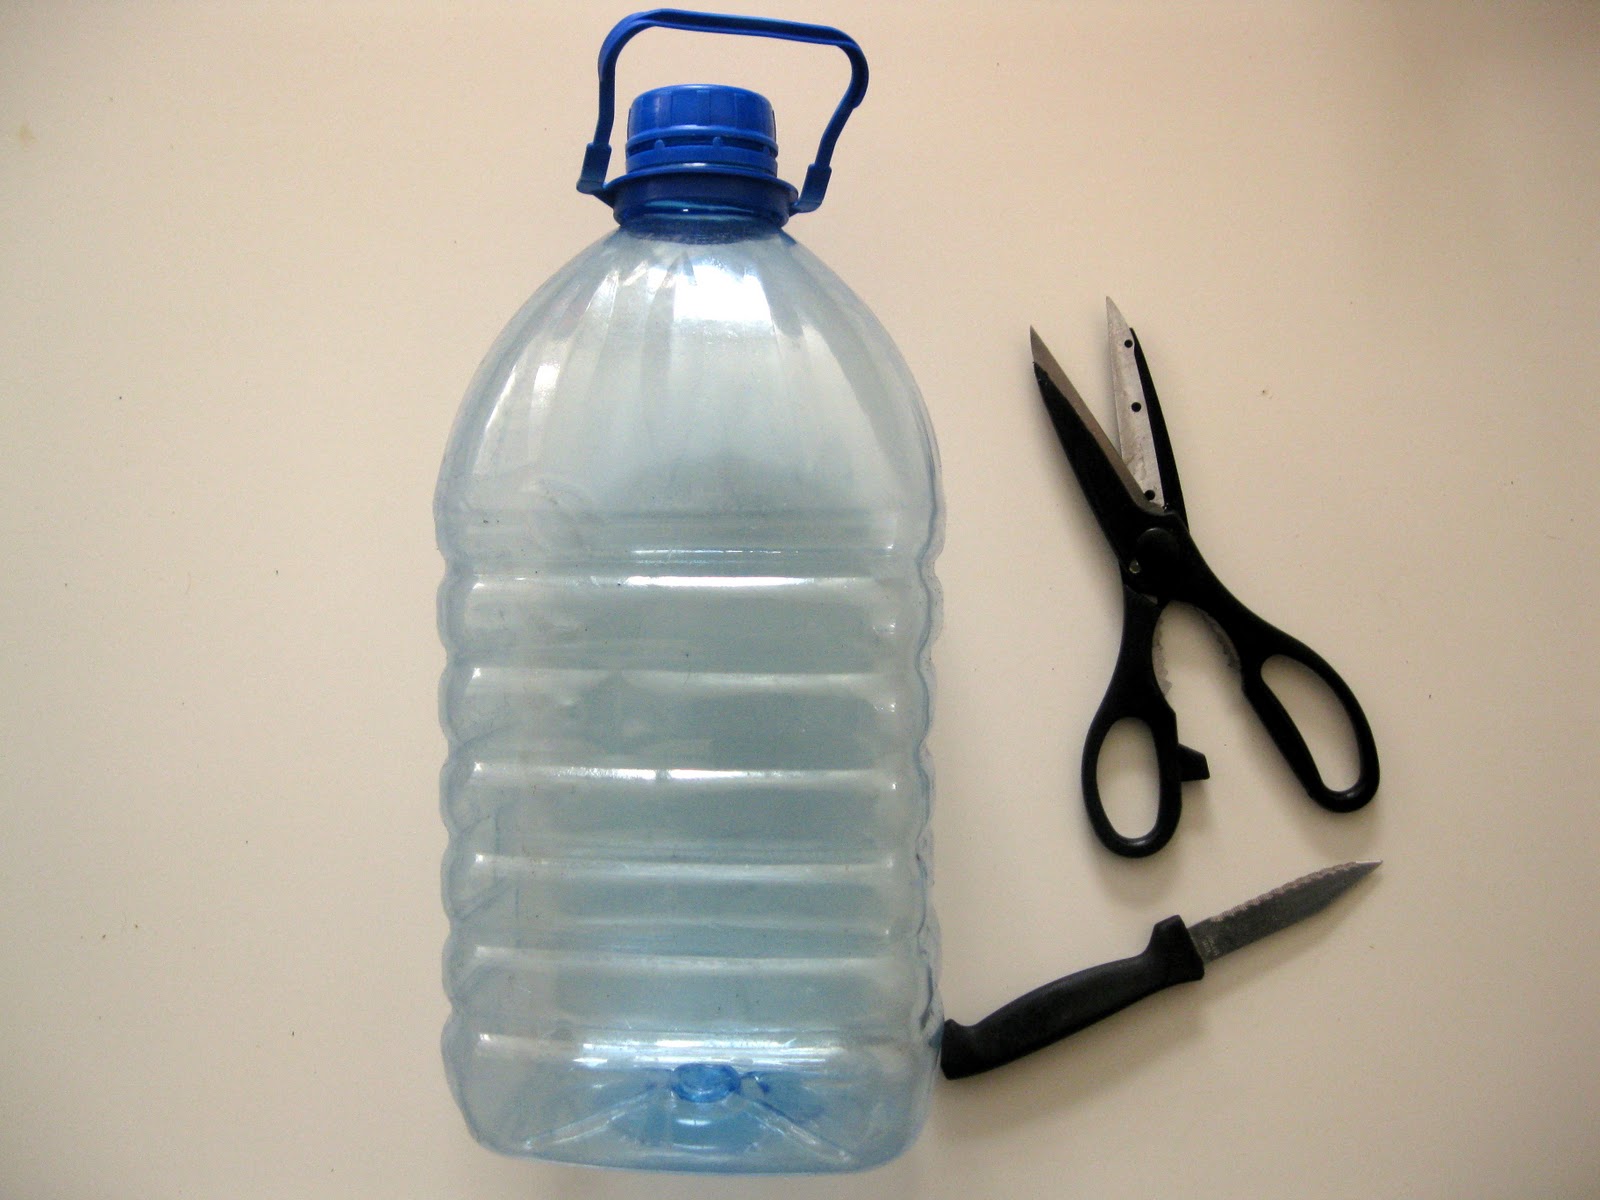
To make a birdhouse:
- Take a five liter plastic bottle.
- Cut a hole with a diameter of 3-4 centimeters at the bottom of the bottle.
- Cover the edges of the hole with tape or adhesive tape to prevent birds from getting hurt by the sharp edges.
- The fastening of the birdhouse-bottle can be made in the form of a loop protruding from the neck and clamped with a lid.
- Additionally, you can insulate the birdhouse by wrapping it with felt and tape.
- Finally, you can place dry straw at the bottom of the birdhouse or simply sprinkle bird food.
If you are a creative person, you can also paint the bottle or decorate it with decorative elements.

There are many options for feeders and birdhouses made from plastic bottles, but the manufacturing principle is the same for all, this is cutting out a notch, a fastening device and your imagination for the design.
Instructions for making a birdhouse from a plastic bottle are also in the video:
Birdhouse made of cardboard
Despite the absolute lack of resistance of cardboard to water, it is quite possible to make a birdhouse out of it that will last at least a year. Below are a drawing and instructions for making a birdhouse out of cardboard. 
To make a cardboard birdhouse:
- Take a sheet of cardboard or disassemble one or more cardboard boxes. The denser and thicker the cardboard, the longer the birdhouse will last.
- Draw on the sheet the pattern you see in the picture.
- Cut out the drawn parts.
- Bend the pieces along the fold lines.
- Take wide tape and cover the inside and outside of the parts with it. Also, instead of tape, you can use any waterproof material and glue. On the inside of the front wall, under the hole, stick a piece of coarse fabric so that the birds can easily climb from the nest to the entrance.
- Glue the gluing areas with universal glue.
- Reinforce the glued corners by placing strips of tape on them.
- Use scissors to cut a hole for the tap hole.
- Cover the inside of the tap hole with tape.
- Make a hole and insert the pole.
- Paint the birdhouse with paints or decorate it with decorations.
It is worth noting that it is better to glue the roof in such a birdhouse using tape and, as needed for cleaning, cut the tape with a knife and remove the roof.
 Birdhouse made of cardboard
 The birdhouse is made of cardboard and is very light in weight, so if it is not fastened well it can be blown away by the wind.
You can also learn how to make a birdhouse out of cardboard from the video:
Shoebox birdhouse
A birdhouse made from a shoebox is made according to the same principle as a birdhouse made from cardboard. The main task is to make the parts of the birdhouse absolutely waterproof. This can be achieved either by gluing a waterproof film, or by coating the parts with water-repellent paint. 
Birdhouse made of thick logs
This type of birdhouse is closest to the natural habitat of birds living in tree hollows. To make it you will need:
- A piece of log with a diameter of 20-3 centimeters and a length of 40-50 centimeters.
- Chainsaw or two-handed saw.
- Powerful drill with wide drill bit.
- Large wide chisel.
- Hammer.
- Clamps (for clamping logs during cutting and drilling).
- Nails.
 Leave the walls 3-4 centimeters.
 The technology for making a birdhouse from a log is quite labor-intensive, so it is advisable to carry out this work with a partner.
- Clamp the log with clamps.
- Cut two dies of 4-5 centimeters thick from the log; they will serve as the roof and bottom of the birdhouse.
- Take a drill and start drilling out the inside of the log. When drilling, leave walls 3-4 centimeters thick along the edges of the log.
- If the drill length is not enough for through holes, drill from both sides.
- Using a chisel and hammer, shape the inside walls of the birdhouse into their final, round shape.
- Drill a hole for the tap hole and install a pole or strip underneath it.
- Nail the bottom of the birdhouse.
- The roof of the birdhouse can simply be attached to a few nails so that it can be easily removed if necessary.
 Birdhouse made of logs
 Never make a birdhouse from wet wood, otherwise, after drying, it may crack and fall apart. It is also advisable to treat the bottom, roof and areas of the birdhouse unprotected by bark with water-repellent paint.
You can see another option for making a birdhouse from a log in the video:
Birdhouse made from wine corks
The name of the birdhouse is not entirely correct, since wine corks serve only as decoration. The name would be more correct: a birdhouse decorated with wine corks. In addition to its decorative properties, a wine cork has good thermal insulation characteristics, therefore, birds will be warm in a birdhouse decorated in such an unusual way.
 Birdhouse decorated with wine corks
 If you decide to decorate your birdhouse with wine corks, then prepare the following tools and materials:
- Glue.
- Glue gun.
- Lots of wine corks.
There are three ways to decorate with wine corks:
- The first method involves cutting the cork into several round dies. After which, the dies are glued to the roof and walls of the birdhouse.
- The second method is to cut the cork longitudinally into two semicircular parts and then decorate the walls of the birdhouse with them.
- The third method eliminates cutting. The cork is glued in its entirety.
 Multi-apartment birdhouse decorated with corks
 There is no point in choosing just one way to decorate; the birdhouse will look more beautiful if you decorate it in all three ways. For example: the roof - with dies, the side walls - longitudinally cut, and the front wall - with whole plugs.
Options, design and decorative elements of birdhouses
There are many options for birdhouses of unusual shape and design, we offer you photographs of some of them:

- Birdhouse - “barrel”. It is made from half-bent slats and round blanks glued together. Plastic elements imitating vines and hemp rope were used as decoration. Such a birdhouse is difficult to make and is not recommended for making by people who do not have experience in carpentry.
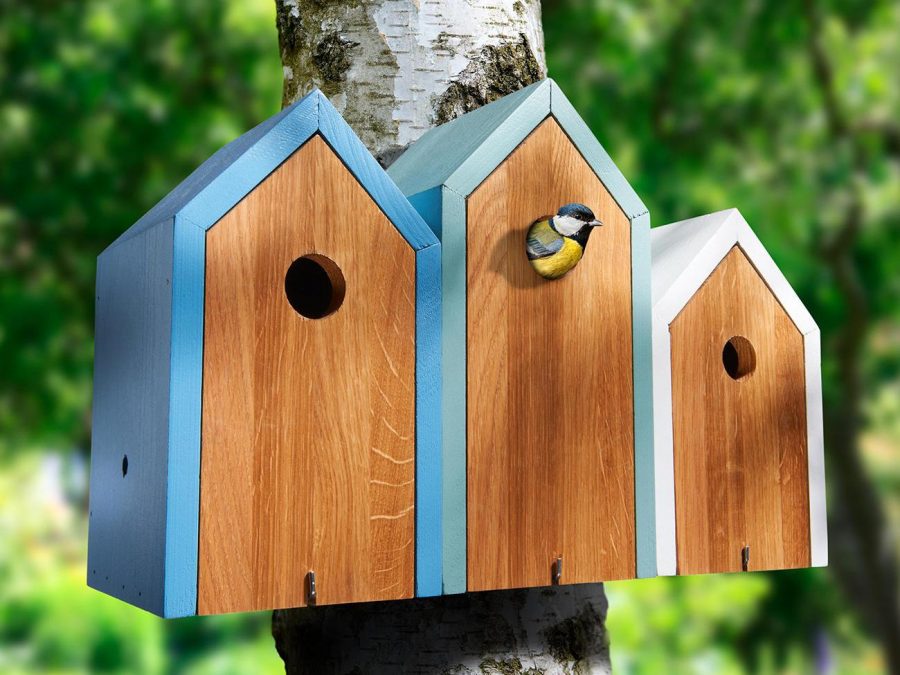
- The “three-room” birdhouse is made of three sections of different shapes, connected to each other. The peculiarity of the birdhouse is that it uses the front wall as a removable element, and not the roof as in conventional models.

- Birdhouse - “shoe”. A budget option for a birdhouse made from an old shoe. Boards and galvanized iron were used as protection against precipitation.

- Birdhouse from the body of an old rotary telephone. The birdhouse is not environmentally safe, since substances harmful to birds can be released from the plastic body when heated in salt licks.

- Birdhouse from an old canister. A successful design solution, but the use of metal products for nesting birds is not recommended by ornithologists, because in the summer it is hot in such birdhouses, and in the cold season the birds can freeze.

- Birdhouses decorated with stones. A beautiful option for birdhouses, but a significant drawback can be the weight of the product, especially when installed at a height.

- The birdhouse - “hut”, is made of laminated veneer lumber, folded together from a rustic log house. A beautiful birdhouse, but very difficult to make.
Thanks to human imagination, houses for birds will always be replenished with new options; it may turn out that you will become one of the authors of the new birdhouse design!

Everyone has thought about how to make a birdhouse at least once in their life. However, only a few got around to it: some were hampered by lack of skills, others by free time, and others by imagination. Meanwhile, making a birdhouse with your own hands is not difficult. Where to start, and what is required to make the structure, read the article.
Birdhouse diagram: detailed drawing and dimensions
Any woodworker will confirm to you that a high-quality structure can only be made if you have a correctly drawn up diagram in hand. And bird houses in this case are no exception. This is the main mistake of many self-taught people. Thoughtlessly copying schemes proposed on the Internet, they make no adjustments for the size of the birds, or for the specifics of their behavior, or for other nuances. In the end, which is not surprising, they get a completely different result than they expected.
To avoid such a development of events, when drawing up a diagram, carefully consider the following points:
Birdhouse dimensions
If we talk about the size of the birdhouse, the drawing for starlings and for the same tits will be different. Therefore, when starting work, the first thing we do is determine which representatives of birds we want to see on our site. So, the following types of birdhouses are popular today:
- A variety of birds choose a birdhouse to live in, so its dimensions can range from 20x10x10 cm to 40x15x15 cm.
- Titmouse is a favorite design of sparrows and tits and other small birds. Therefore, when making it, do not overdo it on a large scale. A design with dimensions not exceeding 30x12x10 cm will be quite sufficient.
- Wagtail, as you might guess from the name, is intended specifically for wagtails. Unlike other birds, these birds are more mobile. They do not jump on the ground, like sparrows, but move along it by running. Therefore, when building a wagtail, place the structure horizontally, and also do not forget to provide it with a sufficiently long (about 10 cm) protrusion in front of the tap hole. Average dimensions of the product: 15x15x30 cm.
- The nesting area of pikas is most often made in a pyramidal shape and with two through entrances. The specifics of the house allow the bird to accommodate itself with maximum comfort and quickly hide from its pursuer (in case of an attack). The width of the structure varies between 14 and 20 cm, height – between 22 and 26. It depends on what kind of pika: short-legged or ordinary you want to lure.
Diameter of the hole in the birdhouse
The diameter of the hole in the birdhouse also plays an important role. To protect birds from predators and feathered competitors, we focus on the following dimensions of the entrance:
- For a birdhouse - about 5 cm.
- The titmouse has no more than 3.5 cm in diameter.
- For wagtails – 3 cm.
- At the nesting sites of pikas it is about 3.5 cm.
Birdhouse drawing
To make a birdhouse that will not fall from the slightest wind and will not fall apart under its own weight, you need a good drawing. We offer several options that are easy to make at home for your reference.


How to build a birdhouse with your own hands: step-by-step instructions
Speaking about how to properly make a birdhouse for starlings with your own hands, the dimensions should be taken not approximate, but specific. Therefore, let’s look at the step-by-step manufacturing of the structure using this drawing as an example:

To create this birdhouse you will need the following materials:
- Strong, high-quality boards 2 cm thick.
- Tools for assembly.
- Buttons and drawing accessories.
- Wood impregnation compositions.
- Materials for the exterior decoration of the birdhouse.
When the preparations are completed, we proceed directly to construction:
Step #1. Based on the drawing presented above, we draw individual structural elements in real size on paper and cut them out.
Step #2. Using a pencil and ruler, transfer the drawing to the boards. For convenience, we attach the paper elements to them with buttons.
Step 3. Take a saw or electric jigsaw and cut out wooden blanks for the future birdhouse. We make sure that the cut goes exactly along the drawn lines, otherwise cracks may form in the house. This means that it will be of little use for cold weather.
Step #4. We decide on the position of the parts. We make the inner sides rough, put notches and scratches on them, so that it is more convenient for the chicks and their parents to get to the entrance.
Step #5. Take a drill and drill a hole for the tap hole. Its upper half can be treated so that the birds do not injure themselves trying to get into the nest. And leave the bottom one as is (for ease of movement).
Step #6. We assemble the birdhouse box, connecting the mating walls with screws. In the example shown, 3 fixing elements for one side are sufficient. If you decide to make the birdhouse larger, the number of fasteners should also be increased.
Step No. 6.1. (optional). If you want your birdhouse to be comfortable not only for starlings, but also for other birds, round the interior space of the product using appropriately shaped inserts. Such an architectural solution will make the birdhouse more like a hollow and will arouse less suspicion among potential “tenants”.
Step #7. Making a lid. We take the workpiece under the upper part and attach to it a wooden block in the shape of a parallelepiped, which is slightly smaller in size than the inner contour of the walls. This addition will prevent the roof from sliding and will weigh it down enough so that neither cats nor other predators can move it.
Step #8. We check how tightly the roof fits to the main structure and how easily it can be removed. If necessary, we trim the inner bar.
Step #9. When the birdhouse is ready, we cover the outside with specialized protective compounds and decorate it at our discretion. We leave the inner part untouched. The feathered residents will independently decide the issue of its arrangement.
A real threat to birds settling in a birdhouse is posed not only by cats, but also by woodpeckers. They destroy the entrance to feast on eggs and newly hatched chicks or for a comfortable wintering. Previously, this behavior was characteristic only of individuals living in the territories of European cities. However, Russian woodpeckers quickly adopted this habit from their brothers, and therefore people making birdhouses have to think additionally about safety.
You can protect your structure from the voracious “forest doctors” in different ways:
- Surround the entrance with a tin ring or strew the space around it with a large number of small, sharp nails.
- Equip the front wall of the structure with a plank, the thickness of which is 2 cm and the width - 4 - 5 cm. To prevent the woodpecker from gouging the wood and getting to the chicks, the fibers in the plank should be positioned horizontally, and it itself coincides with the hole in the entrance.
Making a birdhouse from scrap materials
A wooden house for feathered singers is familiar to everyone from childhood. However, you can make birdhouses with your own hands from other materials. The examples presented are clear proof of this. The main thing is not to rush, and also remember about safety precautions during production. And then you will achieve your goal without unnecessary difficulties.
Construction cardboard
The positive features of the design are the beauty of the assembly and relative cheapness. However, such a bird house will last until the first cold weather. It is perfect for those birds that migrate south with the onset of winter and are ready to return to a new home in the spring. Therefore, we will make a birdhouse just for them.
We collect materials. We will need:
- Drawing tools.
- Glue and tape for fastening.
- Decorative materials for finishing and decoration.
- Construction or corrugated cardboard.
Let's start making:
Step #1. We decide on the dimensions of the future house and print out the proposed drawing in the required scale. To avoid mistakes, first test your scheme for viability using plain paper.
Step #2. We cut out a whole blank or its individual elements from cardboard.
Step #3. We assemble the structure and carefully glue the joints.
Step #4. Let our craft dry, after which we decorate it at our discretion and cover it with varnish or any other protective coating.
The birdhouse is ready. All that remains is to hang it up and wait for the feathered singers to move in.
Water bottles
In many regions, wood is an expensive pleasure, and not everyone can afford to make a birdhouse from wood with their own hands. Therefore, plastic containers (as the base material for a birdhouse) serve as an excellent substitute. Water bottles have all the characteristics necessary for the design:
- They don't rot.
- Resistant to moisture.
- Able to withstand mechanical stress.
The disadvantages of the material are negated by simple modifications: transparency is eliminated with paint, the smoothness of the walls is eliminated with ordinary burlap or a nail.
To make a birdhouse with your own hands from a five-liter bottle, we will need:
- Plastic water containers (volume over 3 liters) – 2-3 pcs.
- Burlap or other thick fabric for decorating the interior walls.
- Decoration materials.
- Tools.
Step-by-step instruction:
Step #1. We wash the bottles, listen, and remove labels and dirt.
Step #2. We cut a tap hole of a suitable size in the container, not forgetting to process its upper half.
Step #3. We cover the inside of the container with dense, rough fabric, which is designed to enhance sound insulation and simplify the movement of birds inside the nest.
Step #4. From the second bottle we cut out decorative elements, for example, tiles. We paint the house and decorate it to our liking. But do not forget that birds are wary of colorful, overloaded structures.
Step #5. We wrap a rope around the neck of the bottle and hang the resulting structure on a tree.
Birdhouse: photos and videos of original ideas
Ornithologists advise not to forget that a birdhouse, like feeders, is made for birds, and not for showing off to neighbors. A colorful house made of fresh boards, decorated with numerous trims, will not inspire much confidence in the birds. They will feel much better in a well-made structure made of planed boards, painted in the color of the location or not touched by paint at all. However, this does not mean that when making birdhouses for birds with your own hands, you should forget about photos, original ideas and drawings. Look at how creatively people approached this issue and were able to “sit on two chairs” at once:


We invite you to help the birds by building cozy houses for them. If birds settle next to you, it will be more convenient to watch them; in the garden they will save plants from insect pests. And in the summer, the most careful observers will be able to see the chicks first fly out of the nest.
Every time birds settle in a house you built, you feel proud that someone else needs it. It turns out that you are not living in vain!
I have long been interested in the question: why are there a dime a dozen great tits in the city, but only one or two in the country outside the city? The secret was revealed quite suddenly, during another conversation with ornithologist Alexei Murashov. It turned out that in the city the doors of numerous dwellings are always open for tits, while in the forests and gardens there are fewer and fewer old hollow trees. Guess where these cute birds live? I would never have found out on my own, even with all my professional powers of observation! It turned out to be in lampposts.
A narrow crack at the top near the lamp is enough for the bird to get inside the “pipe”, and there, dropping several meters down, it builds a nest on a “twist” of wires. Can you imagine WHAT an insufficiently “illuminated” village is losing, what invaluable helpers! Remember the picture from old school textbooks, at one glance at which even an inveterate poor student could understand the benefits of just one titmouse over the summer.
Like now, I see this simple composition: the feathered helper sits modestly on one side of the scale, and on the other there is a huge pile of midges, caterpillars, bugs, larvae and other pests, many times more than the useful bird’s own weight. For greater clarity, I would add a third element to this equation: baskets with a harvest that could be gobbled up and spoiled by all these creeping and flying reptiles caught by the great tit. Birds bring special joy to children, because what is so understandable and natural for us is a sensational discovery for kids. Not far from our dacha lives a buzzard, a large predator that looks like an eagle. My little son has happily recognized him for several years since the first days of his arrival and calls him nothing more than “our familiar buzzard.”
Last spring, a gray flycatcher built a nest above the door of our terrace and the whole family had to wait until the mother fed the chicks before going to the table and eating their cold lunch. Since then, I prefer to hang flycatcher houses myself and will be happy to tell you how this can be done on your site.
Looking ahead, I’ll explain what “combined houses” means. The fact is that a birdhouse or titmouse is just an artificial hollow. Instead, you can use an ordinary nest - a solid piece of round wood with a hollowed out core, but technologically this is quite difficult (you need to have a special tool). However, it is not necessary to make a completely round nest; it is enough to make just one side of an ordinary rectangular box. If, instead of a flat front wall, you use a semicircular slab with bark in which you drill a hole for the entrance hole, then the birds will prefer such a dwelling in the first place. This is a combined house.
Now the question arises: what diameter should the inlet hole be? The answer is simple and concrete: depending on which bird you would like to see inside. If a starling, then 4.5-5 cm in diameter, if a tit or flycatcher, then 3 cm (for small tits it can be even smaller - 2.7 cm). An ordinary tree sparrow can also live in the houses described above. However, do not be upset, firstly, this will only happen if the tit is not happy with the apartment (driving out a sparrow is not a big problem for her), and secondly, anything is better than the silent emptiness of an empty apartment.
The classic wagtail is very similar to a birdhouse that is simply laid on its side. The main feature is that the boards serving as the floor and roof must protrude strongly forward (by 10 centimeters). Thus, the birds will have a fit and the same visor. Instead of the entrance hole, you can cut a regular slotted cut 4 cm wide. Approximate parameters of the wagtail “box” itself: length - 25-30 cm, width - 12-14 cm, height - 10 cm. With the width, we did not take into account the ten-centimeter visor and the same fit , therefore, if you make the floor and ceiling from a solid board, then its dimensions will be 25x22 or 30x24 cm, respectively. Another very important detail is a low partition wall inside the house, which separates the nesting chamber and the hallway. This is necessary to prevent robber birds or cats from getting to the chicks. Wagtails, unlike titmice or nuthatches, are unimportant acrobats, so even at home they prefer to walk on a horizontal floor. They will fly in, go to the partition, fly through it and go straight to their babies. And the babies will not fall out before their due date until they fledge and are able to overcome the barrier on their own.
Another important point is that wagtails do not like dizzying heights, so the optimal distance from the “penthouse” to the ground should not exceed 2-3 meters.
Remember last year I told you the story about the firefighters who painted half the birdhouses green and half red (because there wasn’t enough green) and were very surprised when they discovered that the birds settled in the scarlet houses first? Indeed, they prefer red and gray colors to others, but only if the nesting area was not painted with oil or nitro paint. It is best to do this with water-based emulsion or regular white. It is better not to paint the inside of bird houses, and the walls should be rough and burred. The only exception is, perhaps, the titmice, since it must be dark inside. If the inner walls are black, the titmouse will be very pleased, because its main trick is to scare enemies in the dark, masterfully imitating the hiss of a snake. Imagine: some curious squirrel climbs into a hollow, pokes its muzzle in the hope of profiting from bird eggs, and from there, with a loud hiss, two huge white eyes begin to rush at it (this is exactly what the snow-white cheeks of a titmouse look like on a black head). This is where anyone’s guts will shake!
In fact, titmouses are built in exactly the same way as birdhouses. The only difference is in dimensions. If you want to house a large tit, then the depth of the “box” or nest box should be 50 cm, and if you are trying for small tits, then 25 cm is quite enough. Other songbirds, such as redstarts or flycatchers, can also live in such a dwelling. And the chickadees also definitely need to make a small entrance and pour rotten sawdust inside, half of which the birds will gladly throw into the hole and, having realized their behavioral reflexes, will begin to settle down with a calm soul.
Dimensions of the titmouse: bottom - 10x10 cm (for the small one - 8x8 cm), entrance - 3 cm (for the small one - 2.7 cm). They should be hung at a height of about 3 meters (in parks - from 2-4 meters). If you plan to make the roof removable (which makes cleaning and treating the house easier), then attach it to a couple of nails or secure it with wire.
The optimal size of the bottom should be no larger than the area of the hollow, which is usually hollowed out in trees by a great spotted woodpecker: 10x10, 12x12 or 10x12 cm. If the apartments are larger, then 4-5 chicks will survive in them, which the parents will not be able to feed properly. The offspring will grow up frail, sickly and will not survive the difficult flight to warmer climes. In addition, weak individuals are carriers of various epizootics (after all, starlings are active distributors of many dangerous diseases). In a cramped house, only two or three chicks will grow up, but these will be strong, healthy individuals, less susceptible to diseases and infections, which will maintain the power and strength of the native population. And one more very important point - don’t be overzealous, one birdhouse for ten other artificial nesting boxes for birds (titmouses, flycatchers, wagcats, etc.) is quite enough. In other words, just a few houses for starlings are quite enough for a small garden community, but there should be ten times more other bird houses.
So, to build a birdhouse we will need the following materials:
- Dry unplaned boards. It is preferable to take boards from deciduous wood, such as birch, aspen, alder. We strongly advise against using glued or compressed wood (chipboard, fibreboard, plywood, etc.) when building a birdhouse - it is extremely short-lived when placed outdoors, not to mention its toxicity. It is worth taking boards with a width of 12-16 cm and a thickness of at least 2 cm; with such a thickness, the birdhouse will retain heat well.
- about 20 nails 35-45 mm long
- if you want to make the birdhouse beautiful, you can use water-based paint
From the tool we will take:
- pencil
- ruler
- hacksaw for wood
- hammer
- drill
- feather drill 30-40 mm
- and of course our skillful hands
To build a birdhouse, we offer you 3 drawings that we found on the website. The first of the drawings is the easiest to implement; using its example, we will look at making a birdhouse.
In our example, we took boards 2 cm thick; if you don’t have such, you can use others, but accordingly you will have to slightly adjust the dimensions of the bottom and roof of the birdhouse. You may well take the initiative and deviate from the proposed drawings, but you should take into account several important notes:
- The total height of the birdhouse should be from 30 to 35 cm
- The bottom size should be made from 10*10 to 15*15 cm
- the distance from the bottom to the tap hole should be 15-20 cm
- inlet diameter (tap hole) 30-40 mm
According to the drawing, we cut the boards and proceed to assembly (photos of the assembly process were borrowed from the website):

Prepared boards

We nail the front wall to the two side walls

Insert the bottom of the birdhouse

Nailing the back wall

Assembling the cover

Put the cover in place
- Some birdhouse builders make the entrance hole rectangular - this is, in principle, acceptable, but since birds are naturally closer to a round hollow, they are more likely to settle in a house with a round entrance
- do not try to fit the boards close to each other, the existing cracks will provide the necessary ventilation
- try not to have any protruding nails inside the birdhouse or sharp split edges, you don’t want the birds to get hurt
- We make the roof of the birdhouse removable so that it can be cleaned, but it must be secured to the house by wrapping it with wire or screwing it with screws so that predators cannot get inside
- You can install a perch in front of the entrance hole to your taste - the birds don’t particularly need it
- If you were unable to find unplaned boards, we recommend making several notches with a chisel on the inside of the birdhouse before assembling the birdhouse, because it will be extremely difficult for birds and especially small chicks to get out on a smooth surface
- It is not recommended to paint a birdhouse; the strong smell and bright color can scare away birds, but if you really want to, you can take natural water-based paint and paint the birdhouse gray or red
- if the birdhouse is located close to the house, you can install a video camera with infrared illumination on the inside of the lid and then you will be able to watch the life of your feathered neighbors - how the birds settle in the house, hatch and feed the chicks, how the chicks begin to get out of the birdhouse and take to the wing »
Well, if your hands, as they say, did not grow from there, then you can buy yourself a ready-made birdhouse or a constructor for assembling it on the website
Birds are indispensable helpers in the fight against harmful insects. But in order to “agree” with the birds to provide all possible assistance, you need to attract them to your site. And for this we will learn the basics of building a birdhouse. By the way, the ability to build such bird houses will also be useful for introducing a child to caring about the world around him. So, if the age and development of motor skills of the baby’s hands allow it, take him as an apprentice. In the article you will find different ideas for making bird houses from wood.
What you can do: birdhouse, titmouse and other houses
Much is known about the benefits of birds on the farm, but some figures are still impressive: during the season, a small starling destroys up to a thousand cockchafer larvae. This allows you to keep root crops safe and sound.
If your main goal is to attract birds to the site, then, depending on the planned result, the birds should be of a specific species. But even if the birdhouse is built simply as a feeder, you must take into account that not only starlings populate hanging apartments. So it’s worth first familiarizing yourself with the types of these dwellings, and at the same time some of the engineering features of their construction.
Dimensions for drawings of wooden houses for different birds
Its shape, size and some other nuances will depend on what birds you are building a house for.
- Nesting. A house with a vertical wall at the rear, a long roof slope that joins this wall at an angle of 30–40 degrees, and triangular sidewalls, as well as through entrances. Such structures are built no higher than 1–1.5 m from the ground and are intended for pikas.
- wagtail. This house should be located horizontally at a height of 3–5 m from the ground, since the birds do not fit in a classic birdhouse, the dimensions of the bottom of which range from 14–16 cm, and the walls from 20 to 30 cm.
- Titmouse. This is a habitat for small birds. Height 30 cm, dimensions 10 x 10 cm, entrance 3–4 cm.
- Duplyanka. A kind of “tourist” house for different birds, 2 m from the ground, which can be made from a log with two plugs on top, bottom and an entrance hole in the middle. Outer deck diameter - from 15 cm
- Poluduplyanka. Built for flycatchers. Outwardly it looks like a smaller copy of a birdhouse - 12 x 12 cm and 15 cm high. This house needs to be equipped with a wide rectangular entrance and a sloping roof overhanging it.
- Birdhouse. It has a square bottom 14 x 14 cm and sides in the shape of a rectangular trapezoid. Moreover, the back board should be higher than the front so that the roof rests on them at an angle. It may also have a gable roof.
Photo gallery: types of wooden houses for different birds
Gable birdhouse  Single-pitched birdhouse
  Titmouse
  House for small birds
  Nesting area for owls
  Nesting area for small birds
  Duplyanka
Materials and tools
To make a classic birdhouse you need:
- boards, preferably pine, or a log of suitable width;
- screws, nails of different sizes;
- acrylic weather-resistant paints - if you will paint the product;
- wood putty - fill cracks if necessary.
As for tools, you need:
- hand hacksaw or jigsaw;
- drill with a cutter for cutting out a taphole;
- screwdriver;
- screwdriver;
- hammer;
- pencil, ruler, protractor, compass.
Safety precautions
When designing a birdhouse, you will have to deal with piercing and cutting objects. So you can’t do without following safety rules.
Let's list the main ones:
- When deciding on the housing issue for birds, you need to be focused, attentive and not be distracted by extraneous matters.
- You should work at a comfortable and sturdy table so that you can place all the tools and materials on it.
- If you decide to trim a tree before marking, do it with glasses so that sawdust does not get into your eyes, and with gloves so that you do not have to remove splinters.
- After assembly, make sure there are no nicks left in the bird house, otherwise your feathered guests may be injured. For the same purpose, you need to bend or file the protruding ends of nails or screws.
Birdhouses with step-by-step manufacturing descriptions
Let's consider options for bird houses from traditional to original.
The first attempts to build houses for birds were made by the Hindus in the last millennium. Gradually, this innovation moved to Europe, from where it came to Russia through the efforts of Peter I, who appreciated all sorts of funny things.
Classic birdhouse with a gable roof
Materials and tools:
- 2 rectangular pieces for the sides, 15 cm wide and 22 cm high;
- 3 parts 19X37 cm for the front and back walls;
- 2 pieces 15x15 cm as the floor and one part of the roof;
- pole stick;
- roof part 15x17 cm;
- nails, hammer;
- glue for fixing the pole;
- drill with an attachment for cutting round holes 5 cm in diameter;
- ruler, pencil.
Instructions:
- We draw out all the details on the board and cut them out.
- Don't forget to cut an entrance hole in the middle of the front wall with a diameter of 5 cm at a distance of 19.5 cm from the bottom.
- On the front and rear parts we make a 15 cm bevel under the roof with an angle of 90 degrees.
- We connect the facade and walls.
If necessary, we bend the protruding parts of the nails so that they are pressed tightly against the walls and, to seal, treat the joints with hot wax or a special putty for wood.
- We attach the roof parts to the back wall and facade, joining them well to each other (it is worth puttingtying the seam). Only so that the roof can be raised and the birdhouse cleaned. To do this, it is better to use self-tapping screws that can be unscrewed and then screwed in again.
- We check again to see if there are any protruding nails or screws inside the birdhouse. We fasten the bottom.
- Glue the pole.
Attention! The same model can be made with an easily removable bottom. To do this, we fasten it not with screws, but with long wooden “studs”. By the way, the remaining parts can be attached with wood glue.
Birdhouse made of rectangular parts
A simplified variation of the classic birdhouse, which a schoolchild can make on his own, assumes that all the details of the house are cut out in the shape of rectangles.
Instructions:
- We cut out the details. Please note that all vertical parts are the same, and the bottom is equal in length to the width of one vertical part + two board thicknesses, and the length is equal to the width of the facade. The roof has the shape of a square with sides equal to the length of the bottom.
- In the front part we cut out a taphole with a diameter of 5 cm and a small hole for the pole.
- We connect the vertical parts with nails or self-tapping screws.
- Attach the bottom and roof. Glue in a pole stick.
- We nail the birdhouse onto a long narrow board, using which we will attach it to the tree.
Video: boy makes a birdhouse with a flat roof with his own hands
The original version without a diagram - a bird house from a deck
Materials and tools:
- a deck of suitable size;
- chainsaw;
- drill for removing wood.
Instructions:

Video: log birdhouse - folk method
Light house made of wood and tube
Materials and tools:
- tube;
- a small board with a width no less than the diameter of the tube, a length of at least two diameters;
- jigsaw;
- pencil, compass;
- drill and screws or hammer and nails, long and short.
Instructions:
- Cut off about ¼ of the tube.
- We measure the inner diameter of the hole.
- We make 2 circles of this diameter from the board.
- We fix the first circle on the tree with screws or nails.
- In the second we cut out a round hole-tap.
- We drill a hole in it just below for the pole and insert the pole.
- We place the façade in a tube. We nail it around the circumference with small nails, “drowning” it slightly into the depth, so that the house has a canopy.
- We put the workpiece on the second circle fixed to the tree and also nail it with nails.
If you do not want to damage the tree, you can try not to cut out the back wall from the board, but simply leave the bottom of the tube and then thread a belt or wire through its hole for the handle and secure it to the trunk.
Photo gallery: bird houses made of other materials
 Birdhouses made from plastic bottles can be painted with acrylic paints so that the house is not transparent, but even then there is no guarantee that birds will settle there
  Birdhouses can be made from the most unusual things, for example, from a propane tank
  Birdhouse boots can be decorated with a bright pattern
  This model can only be a feeder, birds will not feel comfortable in a transparent house
  The disadvantages of cardboard “apartments” are their extreme impracticality, as well as their low weight, which creates problems in rainy or windy weather
Tricks for protecting a birdhouse from ruin
The main enemy of bird houses is the cat. If the danger in your area is urgent, here is what you can do:
- We do not make a pole for approaching, otherwise the mustachioed striped ones can cling to it with their paws and destroy the nests;
- we build a canopy that protrudes strongly beyond the boundaries of the front wall so that the cat cannot stick its paw inside while sitting on the roof;
- We do not place housing on horizontal branches.
During the off-season, it is necessary to periodically inspect the birdhouse: white bats can move into such houses.
Two ways to secure a finished bird house
As for the placement of the birdhouse, there are two options for mounting it on a tree:
- nail;
- tie with wire.
The second method is preferable, as it protects the tree from damage. To further protect the tree bark, you can place some elastic material between the trunk or branch and the wrapping. This kind of gasket will take on the entire tension force of the wire.
If you are attaching a birdhouse with wire, it is better to insert small pads, for example, made of automobile rubber, between the wire and the trunk, so as not to damage the tree
Remember also that the new place of residence for birds should be located at a slight angle, so that the house is slightly tilted forward: this will make it easier for the birds to fly.
Making a birdhouse with your own hands is not that difficult. It will only take a few hours, but the benefits for the birds and the farm will be enormous. In the hot season, such structures will be a good “invitation” for birds, which help fight pests in plots and fields. In addition, constructing birdhouses is a great way to get involved yourself and to introduce your child to caring about the world around them.
Higher philological education, 11 years of experience teaching English and Russian, love for children and an objective view of modernity are the key lines of my 31-year-old life. Strengths: responsibility, desire to learn new things and self-improvement.
We will send the material to you by e-mail
There are indispensable attributes of a good garden: well-groomed fruit trees, trimmed shrubs, luxurious flower beds. And if you have all this, but still have the feeling that something is missing, listen. Does the singing of birds please your ears? No? What would it be like without them! How to attract the flood singers to the site, and at the same time protect it from insects that are dangerous for planting? Today we will discuss how to make a birdhouse with your own hands from wood. Drawings, materials, decor and installation, as well as many creative ideas on this topic are in our material.
The little singer is also a diligent helper in the garden
First of all, let’s understand the concept of “birdhouse”. This is housing for small birds, made of wood or from improvised materials, with an entrance, a perch, a roof from the sun and rain, and, most importantly, a place for a cozy nest. Tits, fussy sparrows, flycatchers, wagtails and, of course, starlings can live in such an apartment.
What can you make a birdhouse from with your own hands? Moreover, build it in such a way that this house not only attracts birds, but also becomes a landmark and decoration of the garden? What are the dimensions of the birdhouse, drawing and design ideas?
The best materials for making a bird house
Basket
You can weave a birdhouse from jute rope or use a ready-made small basket. You need to attach a roof to it to protect the nest from the sun and rain and carefully cut the entrance so as not to damage the load-bearing axes of the weaving.

To give the product strength and shape, treat it with acrylic varnish and leave to dry, stuffed with polyethylene. The polyethylene film will easily separate from the walls after the product has dried. Acrylic water-based varnish is safe for birds.

Branches
After autumn pruning of trees and grapes, leave thin branches. You will have something to do in winter - this material can be used to make apartments for tits and sparrows.

Important! Using self-tapping screws, make sure that their sharp tips do not protrude into the socket. Otherwise, they will injure the birds.
Tree
Wood is an ideal material for making a birdhouse. It is closest to the natural living conditions of birds. You can make a house from boards or logs. An old stump, thick bark, and scraps of industrial wood are suitable for a birdhouse.

Dried pumpkin
Place large bottle gourds in a dry, dark place for the winter. In the spring you will receive a dry vessel in which the seeds will rattle. A hole is cut into the pumpkin and the dry insides are scooped out with a spoon.

Advice! Dry pumpkin is a rather fragile material; to cut out the tap hole, it is better to use not a drill, but a Dremel with a small drill. You can use dental drills for this purpose; they will carefully cut out a taphole of any shape and size. If you cover the surface of a dried pumpkin with stain, and then use the same tool to make shallow patterns on the surface, you will get not just a birdhouse, but a real work of art.
Birds will really like this housing. They will enthusiastically clean it of any remaining dry pulp and hatch chicks for your joy. The photo shows examples of such bird houses:


What materials should you avoid?
First of all, let's look at materials that are not very suitable for this purpose:
| Material | Image | Description |
|---|---|---|
| Plastic |  | Transparent plastic will not allow birds to feel private and safe. The sun's rays will penetrate into the nest, and the chicks will be in full view of possible predators. In addition, plastic does not allow air to pass through well and, when heated in the sun, can release toxic substances. This material is more suitable for making a feeder. |
| Juice and milk packaging |  | Sparrows and titmice, although small birds, will not be able to build a nest in a liter juice container, there is too little space. They will fit in a two-liter box, but will not hatch chicks. The masonry will die because there is foil inside the package. It will retain the sun's heat, and the eggs will overheat, and the birds may die along with them. So, although it is tempting to use these improvised materials, it is better to abandon this idea. |
| Chipboard, plywood and fiberboard |  | This may seem strange, but these materials are also not the best choice. The fact is that formaldehyde resins are used in the manufacture of sheets. These are toxic compounds that can have a detrimental effect on the health of the bird family. Plywood and fiberboard do not hold heat well, and chipboard is too heavy and rough material for a small house. |
Features of manufacturing from different materials
Birdhouse made of wood
What should you know to make your own wooden bird house? Even if you have no experience in carpentry, it doesn’t matter. Even a schoolchild can cope with such a simple design.
The following tools will be useful for the job:
- ruler and pencil for marking;
- saw, plane, hammer or screwdriver;
- fasteners: self-tapping screws or small regular nails;
- drill and drill for making holes (taphole);
- sandpaper, tow, wood glue.
Important! It is not advisable to use resinous coniferous wood to make a bird's nest. The resin will make the inside walls of the birdhouse sticky. The resin will stain the feathers and down of the chicks, which can seriously harm the inhabitants of the house.
The best material for work is oak, birch, linden or aspen wood.

For your information! The interior walls of the house do not need to be sanded smooth. Small roughness will help the birds get out of the nest.
To make a birdhouse you will need drawings with dimensions. Typically, an apartment for small birds has standard dimensions in centimeters: 30 (height) x 15 (width). The diameter of the hole for the tap hole is five to six centimeters.
Birdhouse, drawing and dimensions

For your information! For each type of bird there are separate requirements for the size and design of the house. If you want titmice or wagtails to live in your garden, find the corresponding drawings.
Some tips for working with wood:
- Wear gloves; they will protect your hands from accidental splinters and soften the blow of a hammer if your hand shakes.

- Before work, sharpen your plane and hacksaw. Dull tools will not only make the job harder, but will also prevent you from carefully fitting the parts.
- Never saw or drill anything on your knees. Firstly, it is inconvenient, and secondly, it is fraught with serious injuries.
- If you don’t know how to make a birdhouse from boards, choose a simple option - a nest box. For this purpose, you will need a simple log of the required diameter and height.

A drill with a pen attachment will help make the work easier. For the bottom, use a cut from the same log. The entrance can also be made with a drill. The photo shows examples of such work:


Birdhouse made of cardboard
Cardboard bird houses are a product for one season, no more, and they serve more of a decorative function. For this purpose, it is better to use thick corrugated cardboard, such as on postal parcels.

The whole job will take a maximum of half an hour, and this process will be a fun and useful activity for children with their parents.
Advice! To seal the walls of the house, they should be made double or even triple. To do this, the blanks are glued together with wallpaper paste or PVA.
The entrance to a cardboard house can be made square, which makes it easier to cut out the cardboard. The side of the square is six centimeters. Holes are made on the back wall for the rope on which the house will be suspended. The outside of the house can be wrapped with jute rope and coated with acrylic varnish. This technique will allow the structure to last the season, despite atmospheric humidity.

The film can also be used to cover walls. The film should be positioned so that there is a centimeter overlap. This way, water will not get into the joints.
Below is a template with dimensions for a cardboard birdhouse:

Learn more about how to make a cardboard nest with your own hands in the video:
Birdhouse made of paper
Paper bird houses are purely decorative products. They can be used for Easter decorations at home or as gift wrapping. The material you can use is scrap paper, stationery cardboard and colored sheets.

Master class on how to make paper birdhouses with your own hands:
Birdhouse from a bottle
Plastic is not the best material for making bird housing, but if there are no other options, take a five-liter bottle of drinking water to work with.

A round hole should be cut in a plastic bottle. It is better to burn sharp edges carefully. They will melt a little, and it will be easier for the bird to hold on to the edge of the entrance. A long bolt is suitable for making a perch. It is secured with a screw and washer. The metal should not heat up in the sun; it should be carefully wrapped with harsh thread or rope.
To make the inhabitants of the house feel comfortable, the outside should be painted with water-based paint. In two or even three layers so that light does not penetrate inside.
Advice! Use light paint for this purpose, so the bottle will heat up less on hot days.
Make two holes in the bottle cap and thread a rope through them for fastening.
Another mounting option is through the holes on the side of the bottle opposite the tap hole. If you make four holes and thread two ropes, you can firmly tie the house to a tree trunk. It will not be swayed by the wind, as in the first method of fastening.
Advice! For good ventilation in the plastic bird housing that you make yourself, you will need to perforate the walls. Small holes are made on the side walls with a hot knitting needle. You shouldn’t make too many holes, ten on each side is enough.
If the starlings like your design, they themselves will bring material for the nest. You can make their task easier by placing dry grass, pieces of fabric or small twigs inside.
Ideas on how to make birdhouses from plastic bottles, photo:


Birdhouse made of plywood
Bird houses made of plywood are very often found in garden plots. The multilayer structure of plywood makes bird housing reliable and durable.
Advice! For work it is better to use moisture-resistant plywood. This design will safely survive more than one season.
To build a nest with your own hands, you will need wood glue, self-tapping screws and a jigsaw. How to make wall fastenings? For this purpose, a frame is first made from small bars.

To manufacture structures of complex shapes, you can draw up your own drawings. The main thing is to maintain the minimum dimensions required for a bird’s home.
To attach the house to the tree, you need to screw a strip to the back wall. It is better to do this in advance, before the parts are finally assembled.
Advice! If you value your garden trees, do not nail the birdhouse. It is better to fasten it with a thick wire, placing rubber or other dense material under it. This will prevent you from cutting the bark and will help maintain healthy plant growth.
Birdhouse out of the box
A simple and easy to implement idea - a bird house out of a box.

There are many master classes online on how to make a nest out of a box with your own hands.The algorithm for constructing a birdhouse out of a box is simple. A taphole is cut out of the lid, and a perch is made from a long bolt. The installation site of the perch needs to be strengthened. This can be done using two pieces of durable plastic. They should be secured on the outside and inside. To prevent the birds from tearing off the edges of the cardboard entrance ahead of time, they need to be secured with tape or a frame made of a plastic cover. After all these manipulations, the front part of the house is firmly glued to the box. To strengthen the back wall, use a suitable piece of plywood: it can be glued with PVA glue.

Options for birdhouses out of the box in the photo:


Related article:
You, probably, like many site owners, want to know what you can do with your own hands for garden decoration, because decorative decorations in the store are so expensive. In this review we will tell and show what can be created from scrap materials.
Birdhouse dimensions
A lot has been said about materials for birdhouses. It's time to talk about drawings and dimensions. How to make a drawing correctly?
We make the bottom of the nest with a side of fifteen centimeters. Such an area will appeal to starlings. In a small cozy house for birds, the height of the walls is from thirty to forty centimeters. The standard diameter of the hole in a birdhouse for a tap hole according to GOST is six centimeters. In front of the entrance, you need to provide a perch at least five centimeters long.

The house needs to be built with a roof, it will protect the bird family from the rain. The roof can have any type, but its edges must extend beyond the level of the walls by at least five centimeters. Moreover, the roof should also protrude over the entrance to protect it from slanting rain.
The photo shows examples of what the drawings of houses built with your own hands should look like:


Now about how to build a home for different types of birds.
Dimensions of a birdhouse for starlings
Starlings are not capricious birds. They willingly settle in small hollows, in cracks under the roof and even in burrows. So a home-made house for starlings is luxury housing. In gratitude for such an apartment, the little singer will diligently delight your ears with his booming singing and watch over your garden trees, saving them from leaf-eating insects. In a week, he is able to detect and eat about one and a half thousand beetle larvae, as well as caterpillars and other insects.
Drawing of a house for starlings:

Important! Particular attention should be paid to the size of the hole in the birdhouse and its location relative to the bottom. A hole that is too large is undesirable, as the bird will not feel comfortable. The optimal diameter of the hole in a birdhouse for a starling is five centimeters, the height relative to the bottom is fifteen centimeters.
To prevent the chicks from freezing on cool days, there should be no cracks or drafts in the house. The inside of the nesting box should not be slippery; birds cling to rough surfaces with their paws.A perch for starlings is not a required attribute. They will get along just fine without it.
Advice! It is better to make the roof of the house removable. This way, at the end of the season, you can clean the birdhouse and prepare it for the arrival of new residents.
A birdhouse made of wood can last a decade and a half, and with proper care and periodic repairs, even longer. Birds' homes must be periodically painted for preservation, in natural tones, avoiding bright colors.

Advice! In early spring, to attract the attention of birds to your area, hang a feeder. Birds will happily settle next to the free canteen.
Titmouse: drawing and dimensions of the correct structures
How to make a house for yellow-breasted tits? The shape of the house is the same as that of the birdhouse. The only difference is in size. The dimensions of the birdhouse for tits are slightly smaller, about a couple of centimeters in all respects.

Drawings of options for a small titmouse:

For your information! Sparrows, flycatchers and tiny redstarts can nest in a small titmouse. The size of the house will not attract larger birds.
Apartments for birds should be located at a distance of at least fifteen meters from each other. If it is reduced, the birds will prefer other places to settle.
Important! The house is secured in such a way that it has a light pendant towards the entrance. The slanting rain will not fall into the nest, and it will be easier for the chicks to make their first flight.
House for a wagtail: drawing and dimensions, manufacturing features
The wagtail is an invaluable assistant in the garden. She runs around the plantings and collects cockchafers, caterpillars and other pests. With such a garden nursery, the harvest will at least double.
Let's look at how to make a bird house with your own hands. The waggon differs from the usual birdhouse in shape and size. Instead of a perch, it has a balcony, and the house itself is stretched in length and less in height.
Wagtail drawing:

Previously, children made such houses during labor lessons. It's not difficult at all. For the floor you need to prepare a board 12 by 40 centimeters, for the walls - two pieces 14 by 30, one 12 by 140 and another 8x12. The roof should be wider than the bottom, 50 by 22 centimeters. All that remains is to fasten the wooden parts with self-tapping screws, and the wagtail is ready.
For your information! Wagtails arrive in early spring, when ice drift begins. By this time, you need to place the house on outbuildings at a height of three meters.
How to make a birdhouse
Anyone can make a bird apartment. This task can be completed with children. The production of a birdhouse is carried out according to different schemes and using almost any materials that can be found at home.

The simplest drawing of a birdhouse with dimensions is with a sloping roof. We make such a bird house from scraps of industrial wood. The photo shows examples of such beautiful houses:


Work algorithm:
- it is necessary to mark all the details of the future construction on the board;
- cut all the parts and process the outer walls of the house with a plane;
- In the front part of the birdhouse, a round or square entrance is cut out no lower than five centimeters from the roof level. Such a gap will be sufficient for the bird, but will prevent the cat from easily destroying the nest;
- To assemble the parts of the house, carpentry PVA or small self-tapping screws are used. The back wall is secured last. All connections must be free of gaps;
- It is better to make the roof openable, so that you can clean the house in the off-season. One part of the roof is secured with a rubber band, and on the second part a simple lock is installed so that cats or a gust of strong wind does not overturn the small roof.
How to build a birdhouse with your own hands: step-by-step instructions
The video described in detail how to properly make a birdhouse with your own hands. This simple design will brighten up any area. You can give such a house to friends and neighbors, or give it to a kindergarten. It is possible to buy sets of birdhouses with your own hands; such sets are sold in gardening supply stores. Each kit comes with detailed drawings and assembly diagrams that describe in detail how to make a birdhouse.