DIY craft bags: master class with templates and photos. Do-it-yourself craft bags: methods of making them at home Secrets of creating packaging correctly
The strength and simplicity of kraft paper have allowed it to become not only packaging for products and parcels, but also an excellent canvas for gift crafts. Bright decorations on such paper, even an ordinary ribbon, create the impression of decoration by a master with refined taste and attention to detail. This impression helps to increase the aesthetic value of the wrapped gift in the eyes of the recipient. Creating craft bags for gifts with your own hands is not at all difficult, as is decorating them.
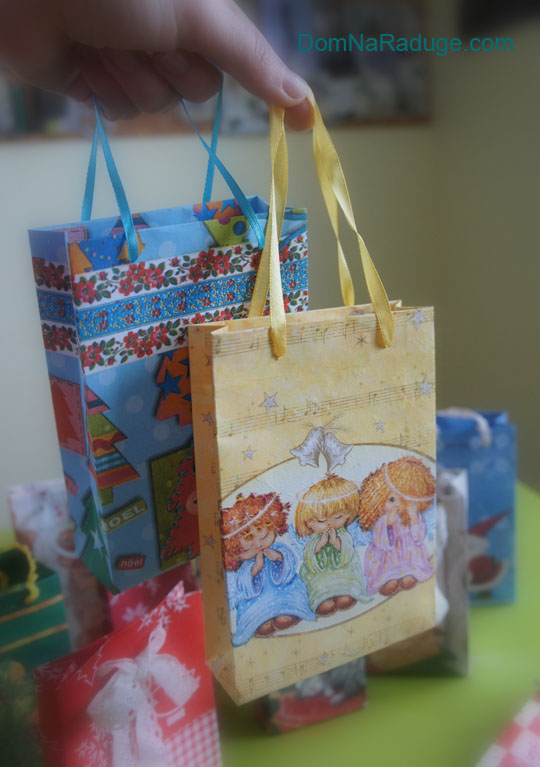
Kraft paper bag
Before you start following the master class on creating craft bags, you need to collect the following materials:
- sheet of kraft paper;
- scissors;
- glue;
- hole puncher;
- ribbon, lace or rope.
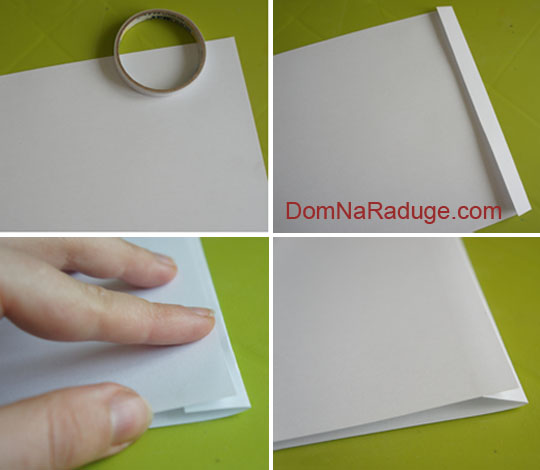
We place the sheet in front of us in landscape projection. We bend one of the side edges towards ourselves. The fold width is approximately 2 cm.
Turn the sheet over and coat the top fold with glue. Glue the opposite edge to the fold.

We bend the resulting part at the sides to give the bag a square shape.

Bend the bottom of the bag away from you, about 5 cm.

After this, we bend the corners on the fold again into triangles to the line of the previous fold.


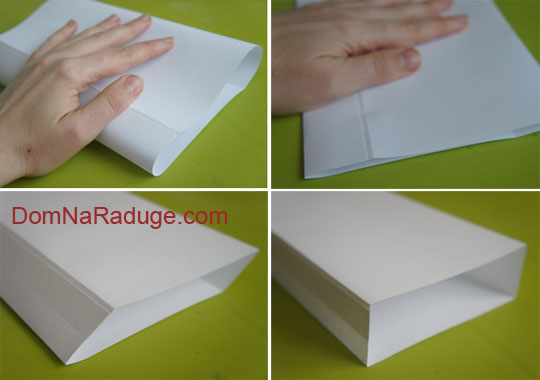
The side walls of the bag are brought into a flat position, while the mentioned trapezoids are slightly bent in the middle.

To glue the bottom, glue is applied pointwise to the sides of the trapezoids and the space between them, after which the sides of the trapezoids are bent inward. First this is done for one side of the two trapezoids, then for the other.

After the glue dries, the bottom straightens - the bag can already stand on its own. The top of the bag should be slightly bent towards the bottom and holes should be made in it with a hole punch through which the ribbon for tying is threaded. You should get a craft package, as in the following photo:

You can create a craft package using the following template:

To make the top of a craft bag not folded, but with separate handles, you need to seal the edge of the top. To do this, at the beginning of the craft, you can wrap the paper inside out, gluing the resulting fold. After drying and making holes with a hole punch, you should pull the tape through the holes in a ring, tying it into a knot inside the bag, or make handles from two tapes tied inside in front of the holes in large knots.
In some homemade craft bags, in order to cover the seams of the bottom inside the product, a rectangle of paper or thick cardboard is placed according to the size of the bottom, but this is not necessary.
Let's move on to registration
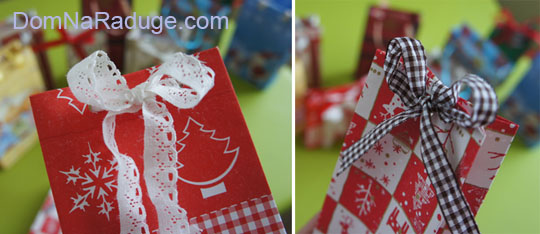
The created craft bag can be decorated not only with various types of ties on the top, but also with other decorative elements.
You can apply your own design to the surface of the bag. Ink, charcoal, pastel, sepia, and sanguine are best suited for drawing on such a surface. The drawing can be either a solid composition or a set of small elements, as in the photo:

In addition to drawings, you can glue a variety of flat crafts onto paper, both from paper and from fabric, acrylic, etc.

The top of the bag can be left flat or grooved. The design with lace also looks very beautiful, in which you can paste it over a bag, or transfer a lace design to the surface of the paper using paint and a sponge.

Decorations can be made from craft paper using templates for patterns made from plain paper. Such decorations look like this:

You should never neglect natural materials when decorating craft bags: Christmas tree branches, pine cones, acorns on strings go perfectly with the light wood color of the paper.
Some aspects of the work
In order to decorate the surface of a craft bag with your own design or stamps, you need to start before gluing the bag itself, since the density of the material may prevent a full print imprint or extrusion of the design lines on the other side of the bag.
If the paper is wrinkled, you can straighten it in the following ways:
- sprinkle with purified water, place between two layers of water-absorbing material and place for several days under a heavy press, for example, under stacks of books;
- straighten with an iron, first covering the paper with a thin towel. In this case, the temperature should be varied gradually from low to high so as not to spoil the paper;
- “roll” the paper on the table using a hard cylindrical object, straighten the edges and corners by squeezing between the index finger and the blade of the scissors, which will even out most of the folds, but may make the surface of the paper round in relation to the plane.

In general, the main part in creating a good craft bag is gluing it, and the rest are an additional component of the process.
Video on the topic of the article
Video for learning and borrowing ideas on creating craft bags:
Craft bags are quite easy to make with your own hands. There are several ways to do this that anyone with a little perseverance can handle.
Learn how to make practical craft bags with your own hands by gluing
The original purpose of craft bags is to sterilize medical instruments. These bags are waterproof, breathable, strong and durable. In the world of handicrafts, gift bags made from craft paper have acquired this name.
This paper is popular due to the durability and environmental friendliness of the material from which it is made, since, unlike polyethylene, it is easily recycled and decomposes. The most commonly found paper color is wood, but white is also available.
Consider a master class on making a gift bag. The easiest way to make a bag is gluing. To do this, you will need a sheet of paper, the format should be chosen in a suitable size, double-sided tape, which can be replaced with glue.
So, on one side you need to fold a sheet of paper with a width that is literally a couple of millimeters larger than the width of the tape. If glue is used, then determine the approximate width of the bend. Next, fold the paper in half so that the edge does not reach the end by 1-2 mm and does not overlap the fold made earlier. Using tape you need to glue the workpiece.
Then you need to determine the desired thickness of the package. You need to retreat this distance from the existing folds and make new ones, while it is important to maintain the parallelism of the lines. Bend the resulting side plane inward, aligning the side edges.
The next stage is the design of the bottom of the package. It is made according to the principle of an envelope. First you need to step back from the edge a distance approximately equal to the width of the side. At this level, the package should be bent first in one direction and then in the opposite direction. The short sides need to be wrapped inside the bag, and the long sides should be overlapped and glued.
We bend the top edge of the bag inward for greater accuracy and strength. We make holes for the handles using a hole punch or a needle. Handles can be made from ribbon. You can basically do without them, just wrap the bag several times and tie it with a ribbon.
When a piece of paper is used for production that is much larger than the required dimensions, a template should be used. It needs to be done by drawing it yourself, using the given dimensions.
In this lesson we'll look at making paper from homemade paper.
In order to make a craft bag, special paper is not always used. You use a regular A4 sheet, cling film, a paper napkin with a pattern, scissors and an iron.
The work surface needs to be covered with something, a prepared clean sheet should be placed on it, over which cling film is stretched. Separate the top layer with the pattern from the napkin. To simplify this task, you can heat the napkin with an iron. We place the design on top of the cling film; if there is any free space left, you can cover it with another layer of paper napkin or separate another design. We iron the resulting structure with an iron, paying special attention to the edges.
We get a fairly thick sheet of paper. The excess along the edges needs to be trimmed and additionally processed with an iron. From this sheet we make a package according to the principle described above.

The previous methods describe the production of a bag that has the shape of a parallelepiped. You can make a cone-shaped bag. To do this, you will need thick, beautiful paper that can support the weight of the contents. Paper decor, for example, a butterfly, to which you need to attach a strip of sheet with words of wishes. Stapler and double-sided tape.
The sheet of paper needs to be rolled into a ball and the corner secured with tape. Place the gift and close with the free edge, which is fixed with a stapler. Don't forget to attach decor with congratulations.

If you need to make a large number of bags, then a sewing machine will come to the rescue. The paper must be immediately cut into rectangles with the required sides. The edge, which will later be the top of the bag, needs to be folded twice and sewn with a straight stitch on the machine. You can immediately sew on the main decorative elements.
Then the side seam is formed. With this manufacturing method, the thin bend is not hidden, but remains outside. You can experiment with the types of seams to determine the one that will provide maximum strength. Or you can fold the paper twice again. The sides of the package are formed as standard, as shown in the photo:

The bottom of the bag is folded in two steps and stitched by machine. Holes are made for the handles using a hole punch. The handles can be any suitable material.
Video selection on the topic of the article
We bring to your attention a selection of interesting videos on making and decorating craft bags.
Today we will create an irreplaceable thing that can always come in handy. This will be a simple paper bag made from craft paper with your own hands, into which you can put any gift if you are invited to a birthday or absolutely any other holiday. We will look at how to make such a gift bag in this master class.
To make the package we will need:
Kraft paper;
cardboard to match the color of the paper;
twine;
metal ruler;
pencil;
glue gun;
hole puncher;
scissors;
glue "Second".
First, let's draw according to the diagram below. We draw a rectangle measuring 45x26 cm, and then divide it into the remaining sectors. All drawn lines will eventually bend and this will allow you to make a bag. There are red lines in the drawing - they mean that in these places you need to make cuts along a certain length.

After we have drawn out the layout of the bag, we cut it out of paper.

In order for the package to turn out neat and with even walls, it is necessary to ensure that the paper does not wrinkle when folded along the lines. To do this, draw the fold lines with the blunt side of the scissors and, preferably, under a metal ruler. You just need to press lightly so as not to tear the paper.

Now, without any problems, we bend the top edge 3 cm wide and glue it tightly to the inside.

We form the fold lines in advance.

All that remains is to glue certain sides together to get the finished package. All walls and bottom should form a right angle.

First, glue the middle triangle onto the left rectangle, the outer triangle under the adjacent one to the left of it.

From cardboard approximately the same color as, cut out a rectangle measuring 14.5x5.5 cm.

We glue this cardboard blank first onto the left rectangle, and then glue the right one on top, while fastening the bottom of the bag.

At the end, we glue the side walls and hide the shorter one inside the bag.

It turns out to be such a neat paper box, which we will now quickly convert into a package.

Approximately by eye, we determine the middle of the side walls and squeeze each with the index finger and thumb so that the bend is inside the bag. We make a bend to the gray height of the package.

Using a hole punch, we make holes so as not to touch the bent walls inside, but so that they are located precisely in the bent upper part.

Now we take two pieces of twine, each 35 cm long. We tie a knot at one end, and thread the other one first from the inside of the bag into one hole, and then from the outside into the second. On the second we tie a knot and cut off the excess ends. If the knot passes freely through the hole, then you can tie a few more on it.


To prevent the knots from falling apart while using the bag, we secure them with a drop of superglue.

As a result, we get a simple paper gift bag that we made with our own hands.


You can now make beautiful packaging bags yourself! With the help of our instructions, you will learn how to make simple, but at the same time beautiful paper bags for gifts. Kraft paper has long occupied first place in the creation of similar things and handmade crafts, so we will use it.
How to make a bag with your own hands?
Making a gift bag will not be easy, you will have to work hard, be very careful and attentive. In addition to these qualities, you also need to prepare the following materials:
Kraft paper, rectangular sheet.
Double-sided tape
Scissors
Hole punch and tape for fastening.
1. We take our paper and put it in front of us. Now we need to bend one of the smaller sides by about 1 centimeter. And on top of it we need to stick a strip of double-sided tape, as shown in the photo.

2. We bend our sheet in half, align it so that the smaller sides of the sheet meet well, after which we smooth the fold line with our fingers.

3. We can fix them with double-sided tape, which we pasted in advance. We do this process in two steps (points 2 and 3) in order to avoid unevenness.

4. Now we need to decide on the width of the package and make the following moves. We open the workpiece and make folds parallel to the side lines. The distance between the old folds and the new ones will be equal to the width of the package.

Thus, we gave the desired shape to our future package.

5. We bend the sides inward, thereby connecting the vertical folds. The resulting internal folds do not need to be ironed.

It should look like this:

6. Let's form the bottom of the bag. We bend one of the edges of the workpiece, the bottom one, up, at a distance approximately equal to the side parts. We go through the folds well so that everything is even, especially the edges.

7. We unbend the just bent bottom, and begin to fix it and put it in place. To begin, we bend the sides into the middle to form bends, as well as the corners of the bottom. We create our corners in all 4 sides, as shown in the photo.

8. We bend the sides into the middle and attach double-sided tape to one of the sides.

9. Release the tape and attach one part to the bottom. To make it stick better, we can melt the bag and stick one hand into it.

10. One side is glued, let's work on the second. Here, double-sided tape needs to be glued not on two sides, but on three. After that, you can glue that side to the bottom.

11 . To make the bottom stronger, we cut out a rectangle a few millimeters smaller from the same paper than the bottom. We glue double-sided tape to one side and move this piece of paper to the bottom of the bag from the inside, with tape down to the bottom.
Sometimes I'm itching to "reinvent the wheel." Don’t go on the Internet and use the ready-made fruits of human thought, but disassemble/figure it out yourself, with your own hands...
This is what happened with paper bags. After all, there are diagrams on the Internet! But no, I picked up the paper and began to twirl it, remembering how it looked when “from the store,” and how it can be done. It’s possible! Moreover, you can do it “by eye”, without a ruler or marking the sheet - just fold it carefully so that the edges of the paper are parallel to each other.
I made these New Year’s bags from “designer paper” made using the hot decoupage method (I will give the “recipe” in the next post):
.jpg)
So, a master class on paper bags is for those who are interested in making not only gifts, but also packaging with their own hands.
1. Take a sheet of paper. I took a regular, white, A4 size. We also need narrow double-sided tape or glue.
We wrap the edge of the sheet, slightly wider than the strip of tape. We fold the other edge towards it so that it slightly overlaps the first fold (approximately 1-2 mm)
2. Glue the edge using double-sided tape. You can also use glue, but make sure that it does not leak over the edges and wait until it dries.

3. Decide how thick your package will be - we determine it by eye. And carefully bend our paper “tube”, keeping the edges parallel. This is how we get smooth edges of our “parallelepiped”.
4. Make an inward fold on the sides of the bag. We align the edge to the edge so that it is parallel.
.jpg)
5. Now we make the bottom of the bag. We look at the side part and measure from below a distance approximately equal to the width of the side. We bend the bottom of the bag first in one direction, then in the opposite direction.
.jpg)
6. We make the bottom like an envelope - as if we were packing a box in paper: we wrap the corners inward at 45 0.
We glue the “ears” with double-sided tape or regular glue.
.jpg)
7. To make the top of the paper bag look neater, fold the edge inward. In addition, if we want to make a bag with handles, then it will be stronger.
We make handles from tape - using a needle or through holes (if you have a hole punch).
.jpg)
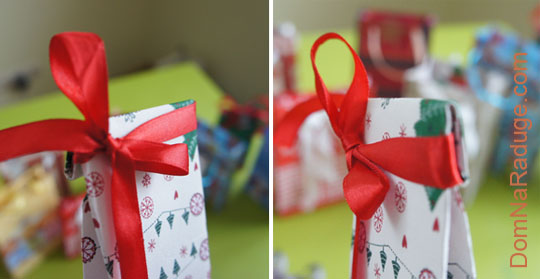
Homemade paper bags are also good because you don’t have to make ordinary handles, but use your imagination - for example, stretch a ribbon through one or two pairs of holes and tie a bow:
Or wrap the top of the bag a couple of times and secure it with tape (loose tea is often packaged in a similar way, only instead of tape there is a flexible strip with wire).
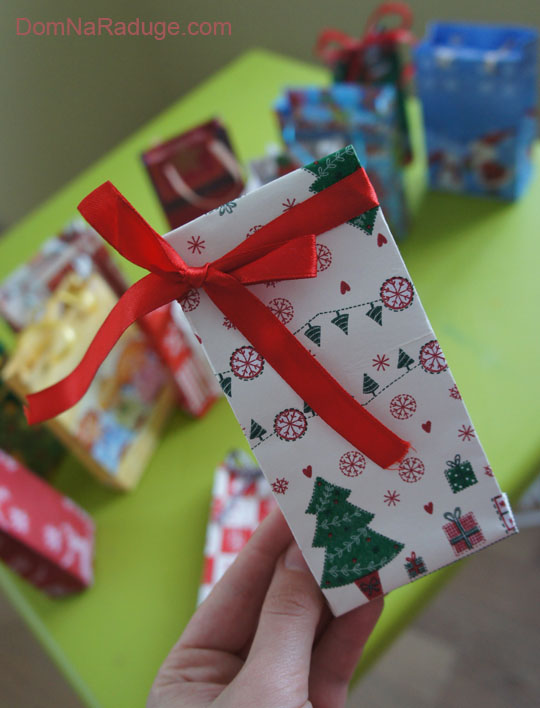
For herbal tea, I made these bags from colored office paper. Kraft bags look good (in combination with red ribbons or white lace). You can make bags from magazines or last year's calendars... And my friend makes them from ebru paper: .
Have a nice pre-holiday effort!
Oksana Shapkarina